Friday, November 13, 2015

Dynamic filtering of the Related Items list on a SharePoint form

Quite frequently our customers ask us how they can dynamically filter their related items lists based on a value entered into a field on a form created in Forms Designer. In this post I will describe how you can do that with a lookup, a drop-down choice and a people picker field. Although I will use these three field types, just about any field type will do for the job.

The steps for implementing this functionality are pretty straight-forward:

  1. Set your related items controls render mode to Client (see screenshot below).
  2. Add a CSS class name to it (see screenshot below). In following samples I will use the “related-issues” class name, if you use something different then replace “related issues” in the code with your class name.
  3. Add the appropriate code to the JS-editor. See code samples below.
Related Items in the client rendering mode

Lookup field

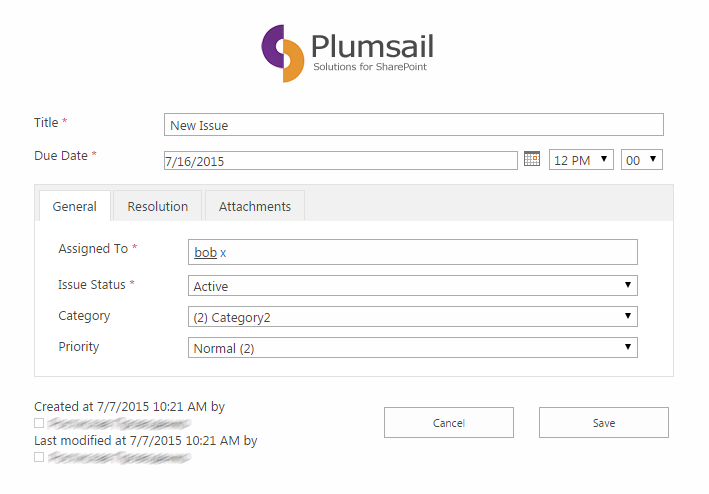
Say we have an issue form with a lookup to a department list and a related items list of other issues. These related issues need to be dynamically filtered based on the value in the Department field. The form will look something like this:

Filtering the related items by a lookup field

When we change the department, the list is refreshed straight away:

Filtering the related items by a lookup field

So, how do we achieve this?

After you have followed through the steps described in the previous section paste the following code into the JavaScript editor of your form:

//first filter on page load
setHash();

//and attach an on-change handler that will call the filtering function wherever the value of the field changes
fd.field('Department').change(setHash);

//this is the actual function that filters the list
function setHash(){
 //get value
 var value =  fd.field('Department').control('getSelectedText');
 if (value == "(None)") {
  value = "";
 }

 value =  encodeURIComponent(escape(value)).replace(/\-/g, "%252D");

 //set the URL’s hash value. An explanation on this is at the end of the article.
 window.location.hash = "InplviewHash" + $(".related-issues [webpartid]").attr("webpartid") + '=FilterField=Department-FilterValue=' + value;
}

In this code you will need to replace “Department” with the Internal Name (or Internal Names) of the field you’d like to filter:

  • Where it says fd.field('Department'), Department is the Internal Name of the lookup field that we get our value from.
  • Where it says FilterField=Department Department is the Internal Name of the field in the target list that is being sorted.

In our case the two Internal Names are the same, but they don’t have to be.

And this is it, now our related issues are auto filtered based on the selected Department whenever user changes the value of the Department field.

Dropdown choice field

Here we will do exactly the same thing, but using the Issue Status field, which is a single-value drop-down choice field.

Filtering the related items by a drop-down field

This is the code:

setHash();

fd.field('Issue_x0020_Status').change(setHash);

function setHash(){
 var value =  encodeURIComponent(escape(fd.field('Issue_x0020_Status').value())).replace(/\-/g, "%252D");
 window.location.hash = "InplviewHash" + $(".related-issues [webpartid]").attr("webpartid") + '=FilterField=Issue_x0020_Status-FilterValue=' + value;
}

Here you will need to replace “Issue_x0020_Status” with the appropriate Internal Name(s), for details on this see the Lookup field section above.

Single-value Client-mode people picker field

In this case we want to filter our issues based on the Assigned To field:

Filtering the related items by a user field

This is our code:

setHash();

fd.field('Assigned_x0020_To').change(setHash);

function setHash(){
 var value = "";

 //if the people picker field really has a value, get it
   if (fd.field('Assigned_x0020_To').value() && fd.field('Assigned_x0020_To').value()[0] && fd.field('Assigned_x0020_To').value()[0].DisplayText){
  var value =  encodeURIComponent(escape(fd.field('Assigned_x0020_To').value()[0].DisplayText)).replace(/\-/g, "%252D");
 }

 window.location.hash = "InplviewHash" + $(".related-issues [webpartid]").attr("webpartid") + '=FilterField=Assigned_x0020_To-FilterValue=' + value;
}

As with the previous field types you’ll need to swap “Assigned_x0020_To” for the appropriate Internal Name value(s), see the Lookup section for more detail.

Other fields

You can utilize this feature with pretty much any type of field, but you need to know how to retrieve the value of the field. For a list of field types and corresponding ways to retrieve their values check this page: http://formsdesigner.blogspot.com/2013/04/getting-and-setting-sharepoint-form.html.

Explanation

To make this work we are utilizing the SharePoint URL hash feature that is used with SharePoint 2013 views in the client-side rendering mode.

Have a look at this sample URL:
https://mywebsite.com/Lists/Issue/fd_Item_EditForm.aspx?ID=20#InplviewHash3f6a312c-cd80-4e64-be27-075b976ced40=-FilterField1=Parent-FilterValue1=20-FilterField2=Issue_x0020_Status-FilterValue2=In Progress

What our code samples do is set the “InplViewHash” part of the URL together with its FilterField and FilterValue values, which is what tells the related items control to sort the list. Simple as that.

Thursday, November 5, 2015

Add related items on a new SharePoint form

We are glad to introduce you our new feature that has become available in SharePoint Forms Designer 3.0.5: the ability to create related items inline and link them to the current item automatically, including when you are on the new item form. You may want to read our post about related items auto-fill here before you proceed.

You may have a related items control on your new item form:

Add related items on a new SharePoint form

And you may want to add an item that is related to the current item. In that case you fill out a field, say Title, and click away or press Enter. The entity is created and with default fields filled out automatically.

New SharePoint form with related items.

Then you click Save and a link between the two items is created. Below is the same item opened in display view after saving. As you can see, the related issue is present:

Edit SharePoint form with related items in the quick edit mode

So, how to set this up? First of all, this feature will only work if:

  • You run SharePoint 2013 On-Premises or SharePoint Online.
  • You run Forms Designer version 3.0.5. In order to update Forms Designer in SharePoint Online simply remove the currently installed version and install the new version from the store.
  • The primary list and the related list are located on the same site.

If everything of the above is true, then let’s go through the setup process.

  1. In Forms Designer drop the related items control and set it’s Quick Edit option to “Only”:
    Related Items in quick edit mode on a SharePoint form
  2. Set up the Data Source as you would do normally
  3. Open up the JavaScript editor and paste something like the following:
    fd.populateFieldsInGrid($('.related-items'), {
     Parent: '{CurrentItem}',
     Assigned_x0020_To: _spPageContextInfo.userId,
     Due_x0020_Date: '12/12/2020',
     Description: 'Related Issue',
     Issue_x0020_Status: 'In Progress',
     Additional_x0020_information: 'This is a supervised issue.',
    });


    Draw attention to Parent: '{CurrentItem}'. Parent is a lookup field to the current list, which is being used as the filter by value in the related items control. It can be displayed in the control, but it doesn’t have to. {CurrentItem} is the new token that specifies the current item, using this token allows you to link related items to the current item even when it has not yet been created.

    I won’t discuss the function fd.populateFieldsInGrid and its syntax further here, please see the aforementioned blog post about it if required.

  4. Add ‘related-items’ CSS Class to the related items control. This class is used in fd.populateFieldsInGrid function to identify the related items control.

    That’s it, now the Parent field of inline-created related items will be set to the current item when the item is saved.

Friday, September 18, 2015

Inline spreadsheet-style edit mode for the Related Items control on a SharePoint form

Forms Designer has just gotten a new feature: the related items control is now able to do inline spreadsheet-style quick editing. This feature is supported in SharePoint 2013 and SharePoint Online in Office 365. It looks like this:

Edit related items in Quick Edit mode directly from the parent SharePoint form

This mode is available when the render mode of the control is set to ‘Client’. When it is, the ‘Quick Edit’ mode cell in the properties window is enabled, and you can select ‘True’ to enable the mode on the control.

Set Quick Edit property to True

The JavaScript framework has also received a function to auto-fill empty cells in this mode. The name of the function is populateFieldsInGrid, let’s take a look at how it can be used.

In the screenshot we add a new record and only fill in its title:

Adding a SharePoint item in Quick Edit mode from its parent form.

And then we click somewhere outside the row or press Enter, and the record gets saved with some default values that we specified in our JavaScript function:

Auto-populating columns of related items in Quick Edit mode.

The related items control is set to filter items that are only related to the current issue, so what we want to do is set the parent of the new related issue to the current issue, and do it implicitly, behind the scenes.

Filtering related items by the parent field

The way to accomplish this auto-filling functionality is to add a snippet of code to the JavaScript editor and add a CSS class name to the related items control (please note that fields you’re trying to fill in with this function don’t have to be present on the form, like ParentIssue isn’t present on the form but is still filled in by our code).

This is our code:

fd.populateFieldsInGrid($('.related-items'), {
 Due_x0020_Date: '12/12/2020',
 Assigned_x0020_To: _spPageContextInfo.userId,
 Description: 'Related Issue',
 Priority: 'Normal (2)',
 Additional_x0020_Information: 'This is a supervised issue.',
 ParentIssue: GetUrlKeyValue('ID'),
});

And we’ve also added ‘related-items’ CSS Class name to our Related Items control (in the properties window of Forms Designer).

In populateFieldsInGrid function above we specify:

  1. A jQuery selector that contains the Related Items control. You can specify an arbitrary CSS class name in the properties and build the selector based on this class as we did in our sample.
  2. A bunch of fields and their default values. (Note that the field names must be correct InternalNames, found under ‘InternalName’ in the properties window).
    • Due_x0020_Date: a date field. Use the date format that is set on your SharePoint installation (the same format you use when you enter your dates manually).
    • Assigned_x0020_To: a single user field. You can either set the value of such field by id of the user, or by his display name (in this case the format must be '-1;#DisplayName'), or by his email (same format '-1;#EmailAddress'). Note the -1’s here are literally -1’s, not some example ids.
    • Description: a text field. Simply specify the text you wish to enter here.
    • Priority: a single lookup field representing text. Specify textual value of the desired entry.
    • Additional_x0020_Information: a multi check box. Enter exact textual values of yours choices, separated by a semicolon and a space.
    • ParentIssue: a single lookup field to the ID field. Specify the ID value. In our example we use GetUrlKeyValue('ID') function to get the ID of the current element.

Thursday, July 9, 2015

Passing and getting Date object to and from date and datetime fields

Another new feature we introduced in FormsDesigner 3.0.1 is the ability to interact with date and datetime fields by passing JavaScript Date objects. This feature takes away the need for consumer to think about parsing dates in locale specific formats and simplifies the way date operations are performed on date/datetime fields. Let us take a look at the following use case.

SharePoint issue form

Here we have our old form for creating new issues. Suppose the priority of an issue we set affects the due date for its resolution: high priority implies that the issue is to be resolved within two days, normal priority implies a 5 day period and low priority leaves the due date undefined.

Because the due date periods are pre-defined and are standard for all issues, we want to auto-assign them based on the priority we set. Here’s how we’ll go about doing it: get the current Date object, add the required number of days to it and set the object to our Due Date field.

This is the code we added to our form to achieve this effect:

function setDate(){
    var date = new Date();
 
    switch (fd.field('Priority').value()) {
        case 'High':
            date.setDate(date.getDate() + 2);
            break;
        case 'Normal':
            date.setDate(date.getDate() + 5);
            break;
        default:
            date = null;
    }
 
    fd.field('DueDate').value(date);
} 

setDate();

fd.field('Priority').change(setDate);

What this code does is:

  1. It defines setDate() method which:
    • Creates a Date object which is initialized with the current date.
    • Checks the value inside the Priority field and depending on it, gets the current date value and adds the respective days offset value.
    • Sets the resulting date object to the field.
  2. It calls the setDate() method when the form is loaded.
  3. And it defines a change event, which calls the setDate() method whenever the Priority value changes.

Now, after we’ve saved our form, we can open it up and see how it works.

Whenever we change the priority value, the due date is automatically readjusted:

SharePoint high-priority issue

High priority.

SharePoint normal-priority issue

Normal priority.

SharePoint low-priority issue

Low priority.

Note

This approach is particularly advantageous if your form is potentially browsed in environments with varying locales, as different locales mean different date formats, which our JavaScript functions take care of.

Wednesday, July 8, 2015

Designing custom forms for smartphones, tablet devices, and regular PCs

Today we’d like to introduce you our new Forms Designer 3.0.1 feature for building custom forms for various types of devices, be it mobile phones, tablets or regular PCs. For all these types you can now create separate Display, New and Edit forms which enables you to customize the way different devices view your website. Let’s take a look at a use case.

Say we have a form that looks like this:

SharePoint form for PC

Navigating such form on a mobile device would be pretty cumbersome, as you can imagine. What we need to come up with is something that looks more like this:

SharePoint form for mobile device

How can we achieve this? The short answer would be to use features introduced in Forms Designer 3.0.1:

  • fd.isMobileDevice() and fd.isTabletDevice() JavaScript functions
  • IsMobileDevice and IsTabletDevice Group values (available only in On-Premises version of SharePoint).

Before we proceed, however, we need to turn off the SharePoint site feature called ‘Mobile Browser View’ as it’s not compatible with Forms Designer. To do this go to Site Settings → Manage site features (under Site Actions) → click ‘Deactivate’ against ‘Mobile Browser View’.

Let us look at a how we would utilize these features for our use case in both versions of SharePoint.

Designing for mobile devices in SharePoint Online

In Forms Designer for SharePoint Online we have form sets, meaning we can create any number of forms for each of the SharePoint form types (Display, New, Edit). Utilizing our fd.isMobileDevice() and fd.isTabletDevice() we can check if our user agent requires a mobile version of our form and redirect him to it.

Our initial form in Forms Designer:

Design of SharePoint form for PC

Let us add a new form set for ‘New Form’ called ‘Mobile’. To do this, click the ‘+’ button in the top-right corner of the window and get the following dialog:

Form set for mobile devices

We’ll enter ‘Mobile’, click OK.

Here we can design a mobile device-friendly version of our form (don’t forget to click ‘Save’, navigating to another form will cause your changes to be lost):

Design of SharePoint form for mobile devices

What we’ve done here is created a miniature version of our logo, brought out required fields onto the main window to allow for a simpler fill-in process, replaced the tab control with an accordion and made the whole form is fit a regular sized smartphone (by placing everything inside a table and setting the table’s size – which is also a new feature of 3.0.1).

Before we go further, look at the bottom-left corner of the window where it says ‘File: xxxxxx.aspx’. Take a note of this filename, we’ll need it later when we write our JavaScript code.

Now that we have designed our mobile version of the form we need to implement the redirect logic. Let’s go back to our default ‘New Form’ and open up the JS editor. This is the code we will add:

if (fd.isMobileDevice() || fd.isTabletDevice())
{
    fd.openForm('fd_Item_e05e9ae8-7eaa-49da-9ad0-0b2fe258e719_NewForm.aspx');
}

What we’re doing here is:

  1. Checking if the user is on a mobile device or tablet with fd.isMobileDevice() || fd.isTabletDevice().
  2. If he is, we’re opening the appropriate form by specifying the filename we have copied above in fd.openForm(filename).

After we’ve pasted in our code with the appropriate filename and saved our form, we’re done. What will now happen is every time a user clicks ‘Add new item’ he will be redirected to a mobile version of the ‘New Form’ if he’s using a mobile phone or a tablet (and if he’s not using a mobile device, he will stay on the initial desktop-friendly form).

The very same procedure would be used if we were creating mobile versions of ‘Edit’ and ‘Display’ forms.

Let’s now have a look at how you could achieve the same thing in SharePoint On-Premises.

Designing for mobile devices in SharePoint On-Premises

The procedure for providing desktop and mobile device versions of a form is even simpler in SharePoint On-Premises: you don’t need to write custom JavaScript code to redirect the user, you can use IsMobileDevice and IsTabletDevice group tokens instead.

Let’s open up the ‘New Form’ form in Forms Designer. We will use exactly the same set-up shown in the previous section.

What we’ll do is add a new group by clicking the ‘+’ button in the top-right corner of the window.

Group of SharePoint forms for mobile devices

We’ll call this group ‘Mobile’ and in ‘User-defined rule’ tab we’ll add the following code:

IsMobileDevice || IsTabletDevice

Click ‘Validate’ and ‘OK’.

A new form will be created as a copy of the desktop form. We’ll change it to make it look the way we want, as shown in the previous section.

Click ‘Save’, and we’re done. Now whenever user wants to add a new item he will be directed to the appropriate form, depending on the type of device he’s using.

Friday, January 9, 2015

Filter related items by almost any field of SharePoint form

In this article I'd like to introduce you to a new feature of SharePoint Forms Designer 2.9.1 allowing to filter the Related items control by almost any form field including lookup, single line of text, number, choice, date, user, and even calculated column. First, I want to demonstrate the most common case, filtering by a lookup column.

Filtering by Lookup column

I've created a list of projects and a related list of issues. The Issues list contains a lookup column to the Projects list. Now I will show how to create a form for the Projects list with the list of related issues in it. We need to put the Related items control onto the project form and configure its data source following way:

Filter related items by lookup column on SharePoint form

Project column of the source list is a lookup to the Projects list. Here is the result:

Filter related items by lookup column on SharePoint form

As you might noticed I've configured filtering by a display column of the lookup column. But if you say have multiple projects with the same title you will see issues of all such projects in the same form. To avoid this you should add ID of the parent list as an additional column in the lookup settings:

Additional lookup field

Now you can filter the related issues by ID of the parent item in the Data Source Editor:

Filter related items by lookup ID column on SharePoint form

Filtering by Date column

Ok, now let's configure filtering by a date column. I've created Daily Reports list to store forms with the list of solved issues filtered by a date specified in the report. As previously, we need to place the Related items control onto the form in Forms Designer and configure its data source following way:

Filter related items by date column on SharePoint form

DateCompleted is a field of the Issues list containing resolution date of an issue. Here is the result:

Filter related items by date column on SharePoint form

Filtering by User column

And finally, I'd like to demonstrate how to filter the Related items control by a people picker field. For this case I've created User Reports list containing a people picker field. Next, we need to design a form with the Related items control linked to the Issues list and filtered by the people picker column:

Filter related items by user column on SharePoint form

Almost done. But in contrast to the previous cases we have to do additional stuff here because SharePoint returns people picker value as a link. So we need to extract plain username from the link and pass it outside the form to filter the related items properly. Put HTML-control onto your form, switch CDATA property to False and insert the following code into Content property:

<xsl:variable name="UserName" select="substring-after(substring-before(substring-after(@User,'userdisp.aspx?ID='),'&lt;'),'&gt;')"/>
<xsl:comment>
<xsl:value-of select="ddwrt:GenFireConnection(concat('*', '@User=', ddwrt:ConnEncode(string($UserName))), '')" />
</xsl:comment>

Please, pay attention that to make this sample working you have to replace the highlighted attributes with the internal name of your people picker field (Form field). Here is the report:

Filter related items by user column on SharePoint form

Summary

In this article I demonstrated how to filter related items by almost any field of the parent form. Please, note that if you need to filter related items by multiple columns, you can concatenate them into a single calculated field and configure filtering by this column. Feel free to ask your questions in the comments.