Wednesday, December 3, 2014

Capture signature or hand-written notes in SharePoint form using tablets or mouse.

In this article I will describe the implementation of two business cases which require capturing hand-written marks and a signature in a form. I will use SharePoint Forms Designer 2.8.12 where Ink Sketch control appeared. With the help of this control you can save a hand-written note created with a tablet, a cell phone, or a mouse to a SharePoint 'Multiple lines of text' field with picked 'Plain text' option:
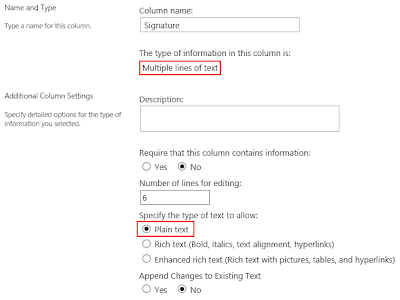
SharePoint 'Multiple lines of text' field with picked 'Plain text' option

It supports all editions of SharePoint 2010/2013 and SharePoint Online in Office 365.

Review of end-of-course questionnaire

The first scenario relates to a training process that ends with questionnaires which have to be filled in by trainees and verified by a trainer. We will simplify the verification process by providing a trainer with the touch interface allowing them to leave marks and notes by using iPad, a cell phone or another touch screen device. The result form for trainers will have the following view:

SharePoint questionnaire form with hand-written marks

First, we should create a form for questionnaire and design different views for students and trainers. I will split them into separate SharePoint groups and create different forms for these groups in Forms Designer. Forms Designer for Office 365 doesn't support groups functionality, so you should modify the result form with the help of JavaScript based on the current user. The first group, students, will be able to edit all fields except the score. The second group, trainers, will be able to score a student and leave marks and notes near each answer. We have to create a number of text fields to save trainer's notes in accordance with the number of Ink Sketch controls on a form. In our case we will use a separate Ink Sketch control for each student's answer, so we need to create the same number of text fields as the number of questions in the questionnaire.

Notice: fields for storing sketches must have 'Multiple lines of text' type with picked 'Plain text' option. You must select the field where you're going to store the sketch in the Ink Sketch properties in Forms Designer.

Here is the first form designed for trainees:

SharePoint questionnaire form for trainees

Here is the form designed for trainers:
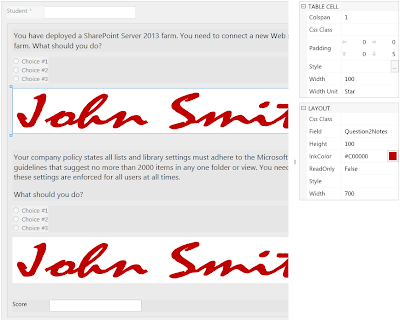
SharePoint questionnaire form for trainers with hand-written notes

As you can see I turned all fields into read-only mode and put Ink Sketch controls near each field to allow trainers to make a separate note for each answer. Also the form for trainers contains the score field in edit mode.

Invoice with signature

The second scenario covers creating an invoice form with signature. As previously, we should create a text field to store the signature. Here you can see my invoice form:

SharePoint form with signature

I used the Related items control to display product items and the Ink Sketch control to capture the signature. Quite easy isn't it? You can use Forms Designer in conjunction with Workflow Actions Pack to create an invoice in PDF format with the signature and send it to your customer or accounting department by e-mail.

SharePoint 2010 and HTML 5

By default, Internet Explorer opens SharePoint 2010 pages in IE 8 document mode but IE 8 doesn't support HTML 5. So the Ink Sketch control uses flash component to provide the capability of drawing on a form. This component is quite slow and requires Adobe Flash Player. But you can switch the Ink Sketch control to HTML 5 mode by modifying your master page. Open it in SharePoint Designer and replace the following line of code:

<meta http-equiv="X-UA-Compatible" content="IE=8"/>

With this one:

<meta http-equiv="X-UA-Compatible" content="IE=Edge"/>

Save the master page and check in. Now all pages will work in the highest mode of Internet Explorer available.

Conclusion

The visual data is saved into SharePoint text fields as base64 string, so you can use it in Render Text Template workflow action of Plumsail Actions Pack to prepare an HTML-page and generate a PDF-file based on it with a signature and other notes created by a user directly on a form. To inject a note into HTML-template you should use the following syntax:

<img src="${{Signature}}" />

In the code above 'Signature' is the internal name of a 'Multiple lines of text' field containing the signature.

Wednesday, July 30, 2014

How to conditionally hide, disable, and make mandatory fields on SharePoint forms dynamically

Here I'd like to demonstrate the most popular cases you may face during implementation of SharePoint forms with complex logic. Most likely you will need to combine the cases described below to cover your requirements but it's quite easy if you have enough samples. To accomplish the tasks below I used SharePoint Forms Designer 2.8.10. All samples work properly for all editions of SharePoint 2010/2013 including Foundations and Office 365.

First of all, I'd like to make an important notice which is common for all the cases. fd.field() method of JavaScript framework expects an internal name of a field you want to retrieve. As you might know, it's not easy enough to obtain an internal name of a field in SharePoint, so we included this property into field properties in Forms Designer 2.8.10:

Internal name of SharePoint field

Now you can just copy and paste it into your code in a much simpler way even without closing Forms Designer. OK, let me start.

Prepopulate field and disable/enable it based on condition

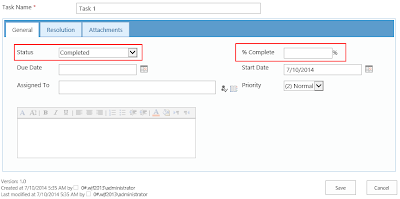
Let's say we have a task form and we need to set the Percent Complete to 100% and disable it when the user turns the Status field into Completed:

SharePoint conditional fields

We should place the following code into JS-editor of Forms Designer:

function setPercentComplete() {
    if (fd.field('Status').value() == 'Completed') {
        // Setting the Percent Complete to 100
        fd.field('PercentComplete').value('100');

        // Getting JQuery-object of the field and disable it
        fd.field('PercentComplete').readonly(true);
    } else {
        // Getting JQuery-object of the field and enable it
        fd.field('PercentComplete').readonly(false);
    }
}

// Calling setPercentComplete when the user changes the status
fd.field('Status').change(setPercentComplete);

// Calling setPercentComplete on form loading
setPercentComplete();

// Enabling fields before the submission
fd.onsubmit(function () {
    fd.field('PercentComplete').readonly(false);
    return true;
});

Please, pay attention to the last part of the code:

// Enabling fields before the submission
fd.onsubmit(function () {
    fd.field('PercentComplete').readonly(false);
    return true;
});

Most browsers don’t send values of disabled fields to the server during the submission, so they will be lost. Therefore, we need to enable all fields that we need to save right before the submission in onsubmit handler.

Hide/show field or set of fields conditionally

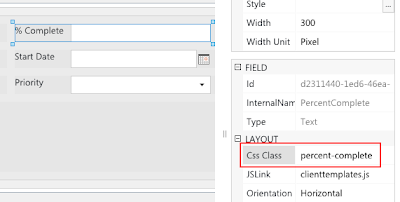
Now I will modify the script from the previous section so that it will hide the Percent Complete field. First, we should assign a CSS-class to the field to use it in JQuery-selector:

Assign CSS-class to SharePoint field

OK, now we can use it to retrieve the field container by the following way: $('.percent-complete'). Here is the modified code:

function setPercentComplete() {
    if (fd.field('Status').value() == 'Completed') {
        // Setting the Percent Complete to 100
        fd.field('PercentComplete').value('100');

        // Getting JQuery-object of the field container and hide it
        $('.percent-complete').hide();
    } else {
        // Getting JQuery-object of the field container and show it
        $('.percent-complete').show();
    }
}

// Calling setPercentComplete when the user changes the status.
fd.field('Status').change(setPercentComplete);

// Calling setPercentComplete on form loading
setPercentComplete();

Please, notice that I've removed the last part from the code because values of hidden fields are passed to the server properly.

What if we need to hide multiple fields? There are several approaches. You can either put them into a single table and assign CSS-class to the table:

Assign CSS-class to multiple SharePoint fields

Next, use that class in JQuery-selector to retrieve the table and hide or show it:

// Hide the table
$('.fields-to-hide').hide();

// Show the table
$('.fields-to-hide').show();

Or if your fields are scattered about the form and you cannot put them into a single table, you can assign the same CSS-class to all fields that you need to hide e.g. 'field-to-hide' and use it in the selector to make all of them disappear:

$('.field-to-hide').hide();

Require field based on condition

At this section I'd like to demonstrate how to make some fields mandatory based on other field values. Let's go back to the original task form and say that we need to make the Due Date field required if the task is assigned to someone (the Assigned To field is not empty).

Here is the sample:

function setRequiredFields() {
    if (fd.field('AssignedTo').value().dictionaryEntries.length != 0) {
        // Add asterisks
        fd.field('DueDate').titleRequired(true);
    } else {
        // Remove asterisks
        fd.field('DueDate').titleRequired(false);
    }
}

// Calling setRequiredFields when the user changes the assignment
fd.field('AssignedTo').change(setRequiredFields);

// Calling setRequiredFields on form loading
setRequiredFields();

// Custom validation
fd.onsubmit(function () {
    if (fd.field('AssignedTo').value().dictionaryEntries.length != 0) {
        if (!fd.field('DueDate').value()) {
            alert('Please, fill in the Due Date field.');
            return false;
        }
    }

    return true;
});

As you can see, I've added the custom validation into onsubmit handler, whereas fd.field().titleRequired() just adds or removes the asterisk near the title.

Get values on display forms

Finally, I'd like to focus your attention on differences between display and edit or new forms. Display forms don't contain controls, so you can retrieve only the text representation of field values like you see them on a form. The samples above work on new and edit forms only. You should use the following syntax to obtain a text representation of values on a display form:

fd.field('Status').control()._el().text()

Get information on how to get or set values of different types of fields from the following article: http://formsdesigner.blogspot.com/2013/04/getting-and-setting-sharepoint-form.html

Please, feel free to ask your questions in comments.

Tuesday, June 10, 2014

Publish a form for anonymous users on a public site in Office 365

In this article I will demonstrate how to design forms for public sites in Office 365 with help of Forms Designer and make them available for anonymous users. As an example, I will create a simple feedback form and place it onto the Contact Us page.

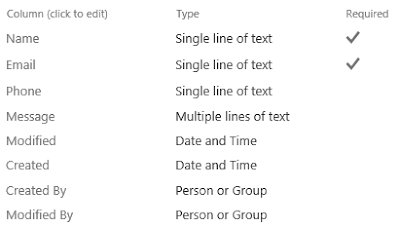
First, we need to create a list to store the requests from anonymous users. I've called it 'Requests' and configured with the following columns: Phone, Email and Message.

SharePoint List Columns

Ok, now I have to grant anonymous users a permission to add new items. Unfortunately, SharePoint Online doesn't provide an interface to achieve it but there is a third party tool that allows to manage anonymous access:
http://anonymous365.codeplex.com/

Upload the solution above to the catalog:
{your public site domain}/_catalogs/solutions/Forms/AllItems.aspx

Activate it. Next, make sure that the limit of server resources for your public site doesn't equal to zero in SharePoint admin center or expand the quota otherwise:

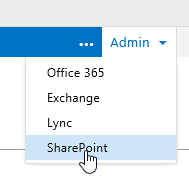
SharePoint Online Admin Center
SharePoint Site Resource Quota

Now, you can find 'Anonymous Access' button on the ribbon of the list:

SharePoint Online Anonymous Access

Open the Requests list, click 'Anonymous Access' and select 'Allow anonymous users to add items to this list' option. Now, when we've provided users with an access to add items, we can deactivate and remove Wsp365.Anonymous.wsp solution.

Next, lets create a 'Thank you' page where the user will be redirected after submission of the form. I've made a new publishing page with the following content: '​Thank you for your message. We will contact you soon.'

Almost done. Now, we need to design a form and publish it onto the Contact Us page. Start Forms Designer to design a new form: go to the Site Contents page, click Forms Designer app, choose Requests list in the drop-down and click Start:

Start Forms Designer

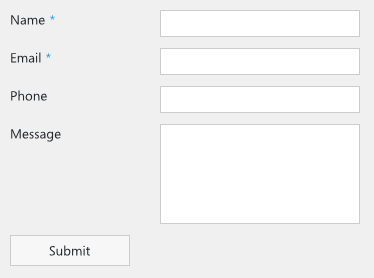
Here is my form:

SharePoint New Custom Forms

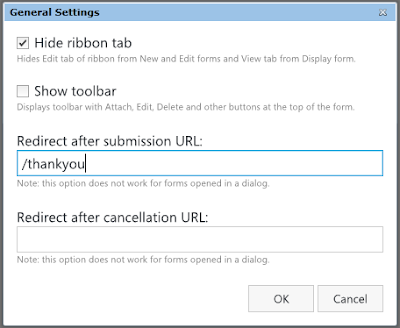
General settings:

SharePoint Form General Settings

Click Export button on the ribbon to save the form into a file. Open Contact Us page, turn it into Edit mode and insert the exported form:

SharePoint Public Form

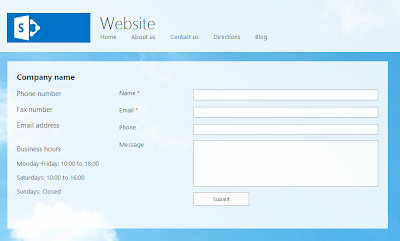
Publish the page. If your form contains required fields, you should fill them in to pass the validation. Here is the result:

SharePoint Online Contact Us Form

With help of our JS-framework you can add extra validation for e-mail and phone number fields if required. Get more information on how to publish forms onto SharePoint pages:
http://www.youtube.com/watch?v=-Lj0dMB-Cww&hd=1
http://formsdesigner.blogspot.com/2014/01/publish-designed-form-to-any-page.html

Please, do not hesitate to leave your questions in the comments.

Saturday, June 7, 2014

Client people picker on a custom SharePoint form

Today I'm going to show how to put the client people picker that has become available in SharePoint 2013 onto a custom form with help of the latest version of Forms Designer 2.8.9. I'm going to pay the most attention to JavaScript framework that allows to assign and retrieve values of the field or handle its changes.

So first I add a Person or Group field to my list and entitle it 'User'. That is the internal name of my field and I will use it later to get the control via JavaScript.

Open Forms Design and put the user field onto a form. In the properties grid you can see a new option 'Render'. Set it into 'Client' and save the form.

Here it is. Quite easy, isn't it?

SharePoint Client People Picker

Ok, now let me show how to manage it via JavaScript. First, I have to say that the control is loaded asynchronously after the page is ready. So you can retrieve or modify the field value only when the control is completely loaded. Our framework provides the 'ready' method to make sure that the control is ready and your code will be executed successfully.

Here is an example that demonstrates the most common actions:

fd.field('User').control('ready', function() {
 // retrieve values
 var selectedUsers = fd.field('User').value();
 for (var i = 0; i < selectedUsers.length; i++) {
  alert('Login: ' + selectedUsers[i].Key);
 }
 
 // assign value by a display name
 fd.field('User').value('Tim Watts');
 // by a login
 fd.field('User').value('DEV\\ann');
 // or by an e-mail:
 fd.field('User').value('AGibson@contoso.com');

 // handle changing event  
 fd.field('User').change(function() {
  console.log('The User field has been changed.');
  var selectedUsers = fd.field('User').value();
  for (var i = 0; i < selectedUsers.length; i++) {
   // check whether the value has been resolved
   if (selectedUsers[i].IsResolved) {
    console.log(
     'Login: ' + selectedUsers[i].Key + '\n' +
     'Display name: ' + selectedUsers[i].DisplayText + '\n' +
     'E-mail: ' + selectedUsers[i].EntityData.Email
    );
   }
  }
 });
});

SharePoint provides its own JavaScript wrapper for the client people picker which can be used in conjunction with Forms Designer's JS-framework. The following sample demonstrates this case:

fd.field('User').control('ready', function(picker) {
 // The 'picker' is a SharePoint wrapper around the people picker control.
 
 // Append a user to the selected ones
 picker.AddUserKeys('Ann Ghibson');
});

This new functionality works for SharePoint 2013 and SharePoint Online in Office 365. I will be glad to answer your questions in the comments.

Tuesday, April 1, 2014

Related documents with support of quick upload

In this article, I would like to demonstrate how to design a form with related documents and how to link new documents easily by dragging and dropping them onto the form. To build this solution I will use Forms Designer 2.8.8 which contains a new JavaScript function for auto filling metadata of the uploaded documents.

For my "proof of concept" I will use SharePoint calendar and a simple document library, but the instructions below work for any types of list and related library, e.g. issues and wiki pages, employees and job descriptions etc.

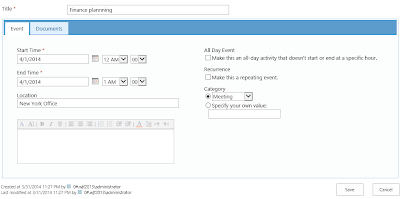
First, I created a Calendar and a Document library, added a lookup field into the document library and connected it with the calendar. Next, I ran Forms Designer from the calendar and designed the Edit form:

SharePoint event form with related documents

I distributed the standard event fields on the first tab and put a Related items control onto the second one. I set Render property into 'Client' to make list refresh automatically when the user drops a document on it. Here is the Data source configuration of the Related items control:

Data source of the related items control

As you can see, I selected my documents library as the data source and filtered it by the lookup column. Well, after that I could drop documents onto this area but the lookup column did not fill automatically and new documents disappeared from the view after uploading. And here I used a new JavaScript function, which had been implemented in Forms Designer 2.8.8:

fd.updateDroppedDocuments(container, fieldValues)

container is a jQuery selector of Related items container which may contains one or more Related items controls.

fieldValues is an object containing the default values of fields. Example:

{
    Lookup: GetUrlKeyValue('ID'),
    Status: 'Closed'
}
Note: the field names of the object have to match the internal names of the related library.

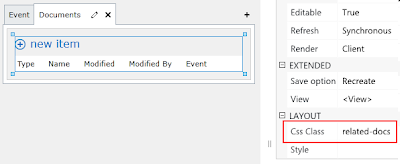
First, I assigned a CSS-class called 'related-docs' to my related documents.

Assign CSS-class to the related items control

Next, I put the following code into JS-editor:

fd.updateDroppedDocuments('.related-docs', {
    Event: GetUrlKeyValue('ID')
});

As you can see, I built the jQuery selector based on the assigned CSS-class and set the current event ID as the default value of the lookup field whose internal name is Event.

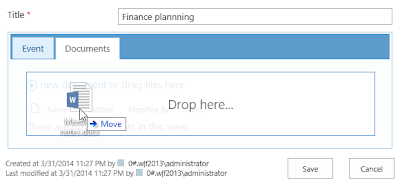
Ok, now, when the user drops a document onto the second tab, the lookup field is automatically filled with the currently opened event and uploaded documents appear immediately in the related documents section:

Drop documents onto the parent form

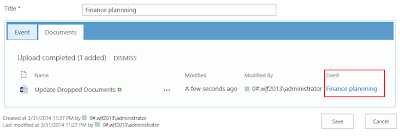
Here is the result:

Default value of the uploaded document

Please, note that with help of fd.updateDroppedDocuments function you can pre-fill not only a lookup field but any other fields. As the default values you can use field values from the parent form, constants, query parameters and other values retrievable in JavaScript.

As usual, I will be glad to answer your questions in the comments.

Thursday, January 30, 2014

Change of approval status in SharePoint edit form

In one of my previous posts I have described how to customize toolbar buttons in SharePoint forms and how to add Approve and Reject buttons to the bottom of Workflow tasks in particular. Geir Mathisen commented on this post that it would be nice if Approve and Reject buttons could be used for changing approval status in the lists and libraries with content approval enabled. In this article I would like to cover this case.

First, we have to enable content approval feature which allows to make items or documents visible only to submitters and users with special permission (Approve/reject items) unless they are approved by these users. Go to the list settings and choose Version Settings section. Here, we should set 'Require content approval for submitted items' option to 'Yes'.

Now that we enabled content approval feature in our list, new columns - Approver Comments and Approval Status were added automatically but they do not appear in the list of fields in settings and in Forms Designer. We will add them to forms with help of HTML-control. Open Forms Designer, choose Edit form and place HTML-control with the following content:

Comments: <br />
<SharePoint:FormField id="_ModerationCommentsField" 
FieldName="_ModerationComments" 
runat="server" 
ControlMode="Edit" 
__designer:bind="{ddwrt:DataBind('u','_ModerationCommentsField','Value','ValueChanged','ID',ddwrt:EscapeDelims(string(@ID)),'@_ModerationComments')}" />

FormField is SharePoint component which renders control for a specific field and form mode. In our case it will be Approver Comments field whose internal name is _ModerationComments in edit mode. So if you wish to place Approver Comments field in display or new form, you have to specify the appropriate mode in ControlMode property: Display or New. As you may have guessed, the most valuable part of this code is __designer:bind attribute with ddwrt:DataBind function. I will not get deeper into technical aspects of this SharePoint control, just say that this property is required to map control and field and define control event that will notify SharePoint that field is changed. You can omit __designer:bind attribute if ControlMode of your field is Display. If ControlMode is New you have to set the first parameter of ddwrt:DataBind function to 'i' which means 'Insert'. You can get more information on SharePoint data binding in the following article: http://www.bryancook.net/2009/09/understanding-sharepoints-ddwrtdatabind.html

Ok, next we have to set CDATA property of HTML-control to False. This property has become available since 2.8.6 version of Forms Designer. If it is 'True', __designer:bind attribute will be ignored by SharePoint and entered data will not be saved.

Great, now we can modify Approver Comments fields directly in edit form. Unfortunately, SharePoint does not support controls for Approval Status in edit or new modes so, we have to define them ourselves. Put a new HTML-control with the following content to your form:

<div class="moderation-status-field">
<asp:HiddenField id="_ModerationStatusField" 
runat="server"
Value="{@_ModerationStatus}"
__designer:bind="{ddwrt:DataBind('u','_ModerationStatusField','Value','Load','ID',ddwrt:EscapeDelims(string(@ID)),'@_ModerationStatus')}" />
</div>

Here, I put a hidden field and bound its value to Approval Status field. It could be text box as well as drop down, but I am going to set value of this control via JavaScript when user clicks the appropriate button: Approve or Reject, so the hidden field is the most suitable for my needs. As you can see, I wrapped the hidden field into DIV container to get it in JavaScript by CSS class. Approval Status field accepts the following values:
0 — Approved
1 — Rejected
2 — Pending
3 — Draft
4 — Scheduled

Do not forget to set CDATA of HTML-control to False.

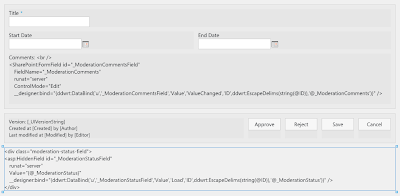
Now, we should enable buttons feature of Forms Designer and put two additional Save buttons at the bottom of our form: Approve and Reject. Here is my form in Forms Designer:

SharePoint form field data binding

Next, we should implement OnClick handler of Approve and Reject buttons to set the appropriate value of Approval Status.

Code for Approve button:

$('.moderation-status-field > input').val(0)

Code for Reject button:

$('.moderation-status-field > input').val(1)

Here is my final form:

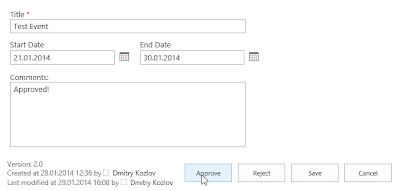
SharePoint Content Approval Status on Edit form

When user clicks Approve button the current item is saved and turned to Approve state, since Reject button turns item to Rejected state.

Should you have any difficulty following these instructions, feel free to leave your questions.

Tuesday, January 28, 2014

Publish the designed form to any page within the current site

In this article I am glad to present a new feature which allows to publish the designed forms to wiki, publishing and web part pages within the current site. It was implemented in SharePoint Forms Designer 2.8.6 which has been available for downloading since January, 27. I will now demonstrate how to use it in a real scenario.

Let us say that we have a helpdesk system and wish to create a compact homepage with the most important information and actions for our requestors. This page will contain the list of issues created by the current user, and a form on the right side for creating a new issue with essential fields only. For this case we should create a new page '/SitePages/Requestor.aspx' based on 'One column with sidebar' layout and place the list of issues filtered by the current user and grouped by status in the main column. Now, let us design a form for creating new issues for the sidebar. Go to the list of issues and open Forms Designer from the ribbon.

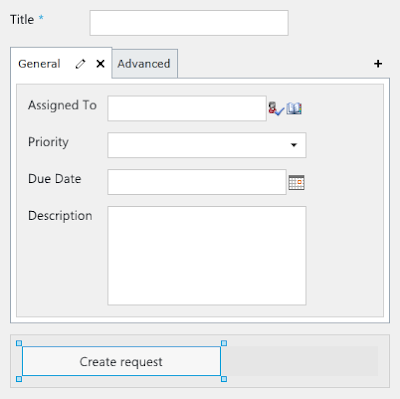
I designed a compact form with two tabs, the first for the most valuable fields whereas the second for additional information, e.g. category of an issue and attachments. At the bottom of my page I left Save button only and renamed it to 'Create request'. You can enable customization of bottom panel containing Save/Cancel buttons via 'Buttons' command in the ribbon.

As you can see, my form is small enough to distribute it at the sidebar of our homepage for requestor:

SharePoint Forms Designer

In the ribbon of Forms Designer you can see a new button 'General' in Settings section. Click it.

SharePoint Forms Designer General Settings button

Here you can find settings to change visibility of the contextual tab of the ribbon and the toolbar of actions which duplicate those in the ribbon, e.g. attach, delete, etc. Next, there are two inputs for URLs where the current user will be redirected after submission or cancellation. By default, users go to the default view of list. So, I hid the ribbon, made the toolbar visible to allow users to attach files and set URL for redirecting after submission to '/SitePages/Requestor.aspx':

SharePoint Forms Designer General Settings

Now, we have to export the designed form into a file:

Export SharePoint Form

Ok, let us go to the requestor homepage and open it in edit mode:

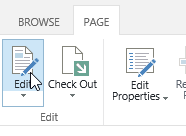
SharePoint edit page

Put the cursor into the sidebar and select Insert tab in the ribbon:

Add SharePoint form

Click New Form and choose the exported form in the dialog:

Import SharePoint form

Click Publish. Your designed form will appear right under the cursor in the sidebar. Here is my requestor homepage:

Publish SharePoint form to page

In the example above I have demonstrated how to publish the designed forms to wiki pages, but you can also distribute your forms on publishing and web part pages in absolutely the same way. Also note that you do not have to save the designed form in Forms Designer, just export it into a file. So, you can have different forms for creating items from multiple pages and from the list itself. If you need to modify the published form, you can import it into Forms Designer, make changes, export into a file and publish into the page as described above. The existing form will be replaced.

Please, leave your questions.